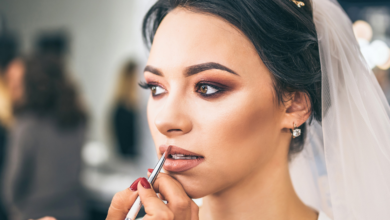
So you want to rock a glamorous and sultry look with a touch of mystery? Look no further than the Smokey Eye! This iconic makeup technique has been used by makeup enthusiasts and celebrities alike to create a mesmerizing, smoldering effect around the eyes. In this article, you will learn the secrets to mastering the art of the Smokey Eye, from choosing the right shades to blending like a pro. Get ready to elevate your makeup game and turn heads wherever you go!

Choosing the Right Eyeshadow Shades
To achieve a stunning smokey eye look, one of the first steps is to choose the right eyeshadow shades. Understanding the basics of color theory is essential in this process. Color theory teaches us that certain colors complement and enhance one another, while others create contrast. When it comes to a smokey eye, it’s all about creating depth and dimension with a combination of light and dark shades.
Understanding the Basics of Color Theory
Color theory is the foundation of any makeup look, especially when it comes to creating a smokey eye. The primary colors are red, blue, and yellow, and by mixing these colors, we can create secondary colors such as purple, green, and orange. To achieve the perfect smokey eye, consider using shades that are on the opposite side of the color wheel from your eye color. For example, if you have blue eyes, warm shades like bronze and copper will beautifully enhance your eye color.
Identifying Your Eye Color
Before diving into the world of eyeshadow shades, it’s important to identify your eye color. By knowing your eye color, you can select shades that will truly make your eyes pop. If you have blue eyes, opt for warm tones like bronze, gold, and peach. Brown eyes can rock almost any shade, but rich jewel tones like plum and emerald can really bring out their depth. Green eyes often look mesmerizing with shades like lavender, mauve, and taupe. Lastly, if you have hazel eyes, try shades that are a mix of warm and cool tones like shimmering burgundy or deep olive green.
Determining Your Skin Undertone
Another crucial factor to consider when choosing eyeshadow shades is your skin undertone. Understanding whether you have a warm, cool, or neutral undertone will help you narrow down the perfect colors for your smokey eye look. Warm undertones typically pair well with earthy colors like browns and warm metallics like gold. If you have a cool undertone, seek out shades like blues, purples, and cool taupes. Those with a neutral undertone are fortunate as they can wear a wide range of shades, from warm to cool, without any issues.
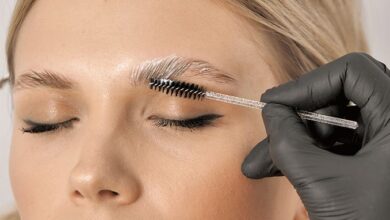
Prepping Your Eye Area
Before diving into the fun of applying eyeshadow, it’s crucial to properly prep your eye area. This step ensures that the eyeshadow goes on smoothly and stays put throughout the day or night.
Cleansing and Moisturizing the Skin
Begin by gently cleansing your eyelids to remove any dirt, oils, or makeup residue. This step creates a clean canvas for your eyeshadow application. After cleansing, it’s essential to moisturize the eye area using an eye-specific moisturizer or a lightweight face moisturizer. Proper hydration prevents your skin from getting dry and flaky, allowing the eyeshadow to glide on seamlessly.
Applying a Primer
To prolong the longevity of your eyeshadow and to enhance the color payoff, applying a primer is a game-changer. An eyeshadow primer creates a smooth base for your eyeshadow while also preventing it from creasing or fading throughout the day. Simply dab a small amount of primer onto your lids, blending it in with your fingertips or a brush to ensure an even application.
Concealing Dark Circles
If you struggle with dark circles or discoloration around the eye area, consider using a concealer before applying eyeshadow. This step will brighten and even out your skin tone, creating a seamless transition between your eyeshadow and your complexion. Choose a concealer that matches your skin tone and apply it gently with a brush or your fingertips, focusing on any areas of concern.
Creating a Smooth Base
To achieve a professional-looking smokey eye, it’s crucial to create a smooth base on your eyelids. This step ensures that the eyeshadow blends seamlessly and creates a flawless finish.
Applying Eyeshadow Base
To set the stage for your smokey eye masterpiece, apply an eyeshadow base or primer all over your lids. This step will not only help the eyeshadow adhere better but also intensify its color. Use your fingertips or a flat brush to apply a thin layer of eyeshadow base, ensuring to cover the entire lid area up to the brow bone.
Setting the Base with Translucent Powder
After applying an eyeshadow base, it’s essential to set it with a translucent powder. Setting the base with powder creates a smooth canvas for blending and prevents the eyeshadow from creasing or smudging. Take a small fluffy brush and lightly dust translucent powder over your lids, gently pressing it in. This step will also help to absorb any excess oil that may cause your eyeshadow to fade or lose its intensity.
Blending Techniques
Blending is the key to achieving a seamless and professional-looking smokey eye. With the right techniques and brushes, you can effortlessly blend different eyeshadow shades to create a captivating gradient effect.
Using a Fluffy Blender Brush
A fluffy blender brush is your best friend when it comes to blending eyeshadow like a pro. This brush has soft, fluffy bristles that allow for seamless blending and diffusing of color. To start, dip the brush into a transition shade, which is typically a mid-tone shade, and sweep it back and forth into the crease area in windshield wiper motions. This will create a soft, diffused transition between the lid color and the brow bone.
Working with Transition Shades
Transition shades are essential in achieving a flawless smokey eye. These shades help to blend different eyeshadow colors together seamlessly, creating a gradient effect. Choose a transition shade that is a few shades darker than your natural skin tone and apply it with a fluffy blender brush, focusing on the crease area. This step will add depth and dimension to your smokey eye look, ensuring a seamless transition between colors.
Enhancing Depth with Darker Shades
To add depth and intensity to your smokey eye, incorporate darker shades into your makeup look. Darker shades can be used to define the outer corners of your eyes or create a smoky effect along the lash line. Use a smaller tapered brush to apply the darker shade into the crease, focusing on the outer V area, and blend it out using small circular motions. Building up the color gradually is key to achieving a perfectly blended and intense smokey eye look.

Adding Definition to the Crease
The crease is an important area to focus on when creating a smokey eye. By adding definition to the crease, you can enhance the shape of your eyes and create depth and dimension.
Locating and Mapping the Crease
To locate your crease, look straight ahead into a mirror and identify the area where your eyelid naturally folds. This area is your crease and is the perfect place to add definition to your smokey eye. Start by lightly mapping out the crease using a soft pencil brush and a transition shade. This will serve as a guideline for your eyeshadow placement.
Applying a Transition Shade
Once you have mapped out your crease, take a fluffy blender brush and apply a transition shade into the crease area. Use back and forth motions to blend the shade into the crease, making sure to focus on creating a soft and diffused effect. This step will help to create depth and add dimension to your smokey eye, giving it that professional touch.
Deepening the Crease with a Darker Shade
To further define the crease and intensify your smokey eye look, apply a darker shade into the outer V corner of your eyes. Use a smaller tapered brush and concentrate the color in a C-shape motion, starting from the outer corner and blending towards the center of the crease. This technique will create a sultry and dramatic effect, adding a touch of glamour to your overall makeup look.
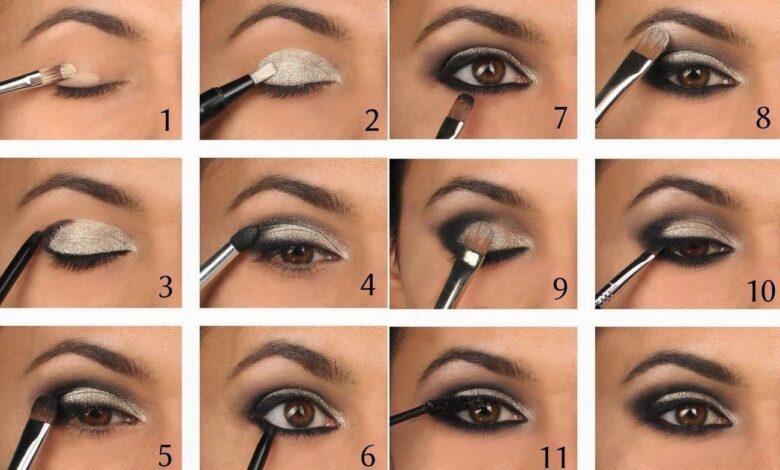
Applying the Smokey Eyeshadow
Now that you have mastered the art of creating a smooth base and have added definition to the crease, it’s time to apply the star of the show – the smokey eyeshadow.
Using a Flat Shader Brush for Lid Color
To apply the main lid color, use a flat shader brush. This brush has dense bristles that allow for precise and controlled application. Load the brush with your desired lid color, whether it’s a shimmering silver, a sultry black, or a glamorous gold, and gently press the eyeshadow onto your lid. Start from the inner corner of the eye and work your way towards the outer corner. This technique ensures even and intense color payoff.
Gradually Building Up the Pigment
To create a truly mesmerizing smokey eye, it’s important to build up the eyeshadow pigment gradually. Start with a light layer of color and gradually add more, blending as you go. This technique allows you to control the intensity of the shadow and ensures a well-blended and gradient effect. Remember, it’s always easier to add more color than to take it away, so start with a light hand and build up as needed.
Blending the Colors
Blending is the key to achieving a seamless and professional-looking smokey eye. Use a clean blending brush to softly blend the edges of the eyeshadow, ensuring a smooth transition between different shades. Small circular motions and gentle back and forth movements will help to blur any harsh lines and create that coveted smokey effect. Take your time with blending, as this step will elevate your entire makeup look and give it that polished finish.

Creating a Cat Eye Effect
If you’re looking to take your smokey eye to the next level, creating a cat eye effect is a fantastic option. This classic and timeless technique adds drama and allure to your overall look.
Using an Angled Eyeliner Brush
To create a cat eye effect, you’ll need an angled eyeliner brush. This brush has a slanted tip that allows for precise and controlled application. Dip the brush into your favorite gel or liquid eyeliner and remove any excess product on the back of your hand.
Applying Eyeliner to the Upper Lash Line
Start by applying eyeliner to your upper lash line, starting from the inner corner and working your way towards the outer corner. Use short, feathery strokes to create a smooth and even line. Make sure to stay as close to the lash line as possible, as this will create the illusion of fuller lashes and a defined eye shape.
Extending the Line for a Winged Effect
To achieve the cat eye effect, extend the line slightly beyond the outer corner of your eye, creating a winged effect. The length and angle of the wing are entirely up to you and can be adjusted based on your personal preference. Experiment with different angles and shapes to find the perfect cat eye that suits your eye shape and desired look. Remember to take your time and practice, as precision is the key to a flawless cat eye.
Highlighting and Enhancing the Inner Corner
To truly make your smokey eye come to life, highlighting and enhancing the inner corner of your eye is a must. This step adds brightness and dimension to your overall look.
Using a Small Detail Brush
To apply highlighter or a shimmery shade to the inner corner of your eye, use a small detail brush. This type of brush has fine bristles that allow for precise application in small areas. Dip the brush into a metallic or shimmery shade of your choice and gently apply it to the inner corner of your eye. This will instantly brighten and open up your eyes, giving your smokey eye that extra pop.
Applying a Metallic or Shimmery Shade
When choosing a shade for the inner corner, opt for a metallic or shimmery eyeshadow. Shades like champagne, gold, or silver work beautifully to add that touch of luminosity and sparkle. Apply the shadow to the inner corner, blending it slightly onto the lid for a seamless transition between colors. This step will not only enhance your eyeshadow but also create a youthful and radiant appearance.
Blending the Highlight
To ensure a seamless transition between the highlighted inner corner and the rest of the eyeshadow, gently blend the edges of the highlight with a clean blending brush. This step will soften any harsh lines and create a cohesive and polished look. Be sure to blend with a light hand and small circular motions to maintain the intensity of the highlight while achieving a natural gradient effect.

Smudging and Smokiness
To add depth and alluring smokiness to your smokey eye, smudging eyeshadow along the lower lash line is a technique you don’t want to skip.
Using a Smudge Brush
To smudge eyeshadow along the lower lash line, use a smudge brush. This brush has short, dense bristles that allow for precise blending and smudging. Dip the brush into a dark eyeshadow shade of your choice and gently press it onto the lower lash line, starting from the outer corner and working your way towards the inner corner.
Applying a Dark Shadow to the Lower Lash Line
Applying a dark shadow along the lower lash line adds depth and smokiness to your overall smokey eye look. The intensity of the shadow is up to you, depending on whether you prefer a soft or bold effect. Remember to start with a light layer of color and gradually build up the intensity, blending as you go, until you achieve your desired smoky effect.
Blending and Smudging the Shadow
Once you have applied the dark shadow, use a clean smudge brush or a small blending brush to blend and smudge the shadow. This step will create a soft and smoky effect along the lower lash line, enhancing the sultry and captivating vibe of your smokey eye. Take your time with blending and use light, feathery strokes to achieve a seamless and well-blended look.
Finishing Touches
To complete your smokey eye look, it’s important to pay attention to the finishing touches. These final steps will ensure that your eyes look stunning and polished.
Curling the Lashes
Curling your lashes is a game-changer when it comes to creating a glamorous and eye-catching smokey eye. A good lash curler can instantly lift and open up your eyes, making your lashes look longer and more voluminous. Place the curler at the base of your lashes, gently squeeze it shut, and hold for a few seconds. Repeat this process in the middle and at the tips of your lashes for the perfect curl.
Applying Mascara
To add the finishing touch to your smokey eye, apply mascara to your curled lashes. Choose a mascara that adds volume, length, or both – depending on your preference. Start at the base of your lashes and wiggle the wand back and forth as you brush the mascara through to the tips. This will ensure that each lash is coated with mascara, providing a dramatic and eye-catching effect.
Adding False Lashes (Optional)
If you want to take your smokey eye to the next level of glam, adding false lashes is an optional but highly effective step. False lashes instantly add drama, length, and volume to your natural lashes, making your eyes stand out even more. Select lashes that complement the shape and intensity of your smokey eye and carefully apply them using lash glue. Remember to trim the lashes to fit your eye shape and blend them with your natural lashes for a seamless and eye-catching finish.
As you can see, achieving a flawless smokey eye requires attention to detail and some skilled techniques. By understanding the basics of color theory, identifying your eye color and skin undertone, and following the proper steps for prepping and applying eyeshadow, you can achieve a truly mesmerizing smokey eye look. So grab your eyeshadow palette, brushes, and mirror, and let your creativity shine as you master the art of the smokey eye. The possibilities are endless, and with practice, you’ll soon be creating show-stopping looks that turn heads wherever you go!

Rimmel London Soft Kohl Eyeliner Pencil Review(Opens in a new browser tab)
Catrice The Matte Cocoa Collection Eyeshadow Palette 010 Review(Opens in a new browser tab)
Maybelline New York Instant Age Rewind Eraser Dark Circles Sand Review(Opens in a new browser tab)