In this article, you will discover how to effortlessly master the stunning technique of the cut crease with the expert tips from stylish.ae. If you’ve ever struggled with achieving that flawless and defined eye makeup look, fret no more. With the guidance provided by stylish.ae’s experts, you’ll learn the secrets to creating a chic and captivating cut crease that will have heads turning. Whether you’re a makeup enthusiast or a beginner, these tips will help you bring your eye makeup game to the next level. Get ready to enhance your skills and unleash your inner makeup artist!
1. Choosing the Right Eyeshadow Colors
Understand your skin tone
When it comes to choosing eyeshadow colors, it’s important to understand your skin tone. Different shades of eyeshadow can either enhance your features or make them appear dull. If you have a warm skin tone with yellow or golden undertones, opt for earthy tones like bronze, copper, and warm browns. For those with cool undertones, such as pink or blue, cool shades like purples, blues, and silvers will complement your complexion. Neutral undertones can rock a wide range of shades, from warm to cool, so feel free to experiment until you find the colors that suit you best.

Consider the occasion and your outfit
Another important factor to consider when choosing eyeshadow colors is the occasion and your outfit. For a casual daytime look, you might want to stick to neutral and soft shades that are subtle and elegant. If you’re going for a bold and dramatic nighttime look, you can play with vibrant and bold colors like deep blues, purples, or even glittery shades. Additionally, it’s essential to choose eyeshadow colors that complement your outfit. If you’re wearing warm-toned clothes, opt for eyeshadow colors that will harmonize with your ensemble.
Blend complementary colors
To create a visually stunning eyeshadow look, it’s crucial to blend complementary colors together seamlessly. Complementary colors are those that are opposite each other on the color wheel. For instance, if you’re using a warm-toned eyeshadow, consider blending it with a cool-toned shade to create contrast and dimension. Blending the colors well will ensure a smooth transition between the shades and a polished finish. Don’t be afraid to experiment with different color combinations and find the ones that make your eyes pop and enhance your overall look.
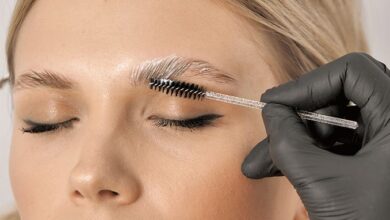
2. Prepping Your Eyelids
Start with clean, moisturized eyelids
Before diving into the world of eyeshadow, it’s essential to start with a clean canvas. Make sure to remove any residual makeup or oil from your eyelids by using a gentle cleanser or makeup remover. Once your eyelids are clean, apply a lightweight moisturizer or eye cream to ensure that your skin is hydrated and ready for the eyeshadow application. Hydrated skin will help the eyeshadow blend more smoothly and prevent it from creasing as the day goes on.

Apply an eyeshadow primer
To make your eyeshadow last longer and prevent it from creasing or fading, apply an eyeshadow primer. This step is especially important if you have oily eyelids, as it helps to control oil and keep your eyeshadow in place. Apply a small amount of primer onto your eyelids and gently blend it using your fingertips or a synthetic brush. Make sure to cover the entire eyelid area, including the crease and the inner corners of your eyes. The eyeshadow primer creates a smooth and even base for the eyeshadow and intensifies the color payoff.
Set the primer with translucent powder
After applying the eyeshadow primer, it’s beneficial to set it with a translucent powder. This step helps to absorb any excess moisture and oil on the eyelids, creating a smooth surface for the eyeshadow application. Use a fluffy brush to lightly dust a small amount of translucent powder over your eyelids, focusing on the areas where you applied the primer. This will ensure that the eyeshadow adheres well and stays in place throughout the day.

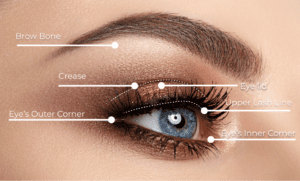
3. Mapping Out the Crease
Locate your natural crease
The crease refers to the fold that naturally occurs on your eyelid when you open your eyes. To create a cut crease look, it’s important to locate your natural crease and use it as a guide for the eyeshadow placement. Look straight into a mirror and identify the area where your eyelid folds. This will help you determine the shape and height of the cut crease you want to create, ensuring that it suits your eye shape and desired outcome.
Use a light-colored eyeshadow to mark the crease
To map out the crease, use a light-colored eyeshadow that contrasts with your skin tone. This will make it easier to see and define the crease line. Using a small brush, apply the light-colored eyeshadow directly along the natural crease line, starting from the inner corner and gradually working your way to the outer corner. Take your time and make sure the line is precise and well-blended. This step will serve as a guide for creating a sharp, defined crease in the following steps.
Blend the mark into your eyelids
After marking the crease with the light-colored eyeshadow, it’s crucial to blend the mark into your eyelids for a seamless transition. Use a fluffy blending brush to gently blend the eyeshadow upwards, diffusing the color and softening the edges. This step is essential for achieving a gradient effect and ensuring that there are no harsh lines between the crease and the rest of the eyeshadow. Pay special attention to blending the eyeshadow near the inner and outer corners to create a smooth, natural-looking transition.
4. Creating a Sharp Line
Use a flat, angled brush
To create a sharp line for the cut crease, you’ll need a flat, angled brush. This type of brush has a thin, precise tip that allows for controlled application and clean lines. Dip the brush into a dark eyeshadow color of your choice, tapping off any excess product. The dark eyeshadow will help define and contour the crease, creating a noticeable contrast to the rest of the eyeshadow look.

Apply a dark eyeshadow along the marked crease line
Using the flat, angled brush, carefully apply the dark eyeshadow along the marked crease line. Start from the outer corner and work your way towards the inner corner, using short, soft strokes. Make sure to follow the natural curve of your crease and maintain the width and intensity desired for the cut crease look. Take your time to create a precise and sharp line, gradually building the color until you achieve the desired depth and definition.
Carefully clean up any mistakes with a concealer brush
Creating a sharp line for the cut crease can be a delicate process, and mistakes can happen. If you accidentally go beyond the desired crease line or create uneven edges, don’t worry. Simply take a small concealer brush and dip it into a creamy concealer that matches your skin tone. Gently clean up any mistakes by using the concealer brush to trace along the edges of the crease, correcting any imperfections and ensuring a clean, defined line. Blend the concealer into the surrounding skin to achieve a seamless finish.

5. Blending the Transition
Choose a medium-toned eyeshadow
After creating the sharp line for the cut crease, it’s time to blend the transition shade into the look. The transition shade acts as a bridge between the cut crease and the rest of the eyeshadow, creating a soft and seamless gradient effect. Choose a medium-toned eyeshadow color that complements the rest of your eye look. This shade should be slightly darker than your skin tone but lighter than the dark eyeshadow used for the crease line.
Apply the shade just above the dark crease line
Using a fluffy blending brush, apply the medium-toned eyeshadow just above the dark crease line. Start from the inner corner and gently blend the eyeshadow upwards towards the brow bone. Use light, sweeping motions to blend the color into the crease, creating a smooth transition. Be mindful not to cover the defined crease line completely but rather to create a gradient effect that seamlessly connects the cut crease with the rest of the eyeshadow.

Blend the color softly upward with a blending brush
To achieve a flawless and well-blended transition, blend the medium-toned eyeshadow softly upward with a clean blending brush. This step helps to diffuse any harsh lines and ensure that the transition shade seamlessly fades into the rest of the eyeshadow. Use gentle circular motions and windshield wiper motions to blend the color softly upwards, focusing on the area just above the defined crease line. Take your time and continue blending until you achieve a natural and gradient effect.
6. Adding Depth and Definition
Choose a darker eyeshadow shade than your transition color
To add depth and definition to your cut crease look, it’s essential to choose a darker eyeshadow shade than your transition color. This darker shade will be focused on the outer corner of your eyelid, creating dimension and accentuating the cut crease. Opt for a color that complements your overall eyeshadow look and complements the rest of the shades you’ve used.
Apply it to the outer corner of your eyelid
Using a small, precise brush, carefully apply the darker eyeshadow shade to the outer corner of your eyelid. Start from the outer V shape, which forms when you draw an imaginary line from the outer corner of your eye to the outer edge of your eyebrow. Apply the eyeshadow in a light tapping motion, gradually building up the intensity of the color. Focus on deepening the color towards the outer corner, creating a gradient effect that adds depth and definition to the overall look.
Blend the dark shade into the outer V shape
Once you’ve applied the darker eyeshadow shade to the outer corner of your eyelid, blend it into the outer V shape to create a seamless transition. Use a clean blending brush and gentle circular motions to blend the eyeshadow into the outer V, connecting it with the rest of the eyeshadow. This step helps to create a harmonious look and ensure that the dark shade appears well-blended and polished. Take your time and blend until you achieve a gradient effect that seamlessly transitions from the dark outer corner to the rest of the eyeshadow.

7. Highlighting the Brow Bone
Apply a shimmery or matte highlight shade
Highlighting the brow bone is an essential step in any eyeshadow look as it adds brightness and dimension. Choose a shimmery or matte highlight shade that is slightly lighter than your skin tone. Shimmery highlight shades create a luminous effect, while matte highlight shades provide a more subtle finish. Consider the overall look you want to achieve and select a highlight shade that complements the rest of your eyeshadow colors.
Use a small brush to apply it under your brow
To highlight the brow bone, use a small brush with soft bristles. Dip the brush into the highlight shade and tap off any excess product. Gently apply the highlight shade directly under your brow, following its natural shape. Start from the inner corner and sweep the brush outwards towards the tail of your brow. Use light, feathery strokes to ensure a soft and diffused application.

Blend the highlight shade downward into the transition color
After applying the highlight shade under the brow, use your clean blending brush to blend it downward into the transition color. This step creates a smooth and seamless transition between the highlight shade and the rest of the eyeshadow. Use gentle circular motions and windshield wiper motions to blend the highlight shade downward, ensuring that there are no harsh lines. Take your time and continue blending until you achieve a well-integrated and polished look.
8. Applying Eyeliner
Choose a gel eyeliner or liquid eyeliner
Eyeliner is a key element in accentuating your eyes and adding definition to your cut crease look. Choose a gel eyeliner or liquid eyeliner, as they offer precision and long-lasting wear. Gel eyeliners usually come in a pot and are applied with a brush, while liquid eyeliners come with a built-in brush or felt tip applicator. Consider your personal preference and comfort level when selecting the type of eyeliner to use.
Create a thin, precise line along your upper lash line
To apply the eyeliner, start by creating a thin and precise line along your upper lash line. Begin from the inner corner of your eye, gradually increasing the thickness as you move towards the outer corner. Use small, short strokes to ensure a controlled application and a clean line. Take your time and build up the intensity of the line as desired. For a more dramatic look, you can create a wing or extend the line slightly past the outer corner of your eye.

Extend the line slightly past the outer corner of your eye
To enhance the shape of your eyes and create a visually elongated effect, consider extending the eyeliner line slightly past the outer corner of your eye. This technique, commonly known as a winged eyeliner or a cat eye, adds a touch of glamour and drama to the overall look. Use the natural shape of your eye as a guide and carefully draw a thin, tapered line that extends outward. Ensure that the wing is symmetrical on both eyes for a balanced and polished appearance.

9. Finishing Touches
Curl your lashes and apply mascara
To complete your cut crease look, curl your lashes and apply mascara for added definition and drama. Using an eyelash curler, place your lashes between the curling mechanism and gently squeeze for a few seconds. This will lift and curl your lashes, making your eyes appear more open and awake. After curling your lashes, apply mascara to both the upper and lower lashes. Wiggle the mascara wand at the base of your lashes and then sweep it upward to create volume and length. Repeat this step until you achieve your desired lash look.
Add false lashes for extra drama
If you want to take your cut crease look to the next level, consider adding false lashes for extra drama and intensity. False lashes come in various styles and lengths, allowing you to customize your look according to your preference. Choose lashes that complement the shape of your eyes and enhance the overall look. Apply a thin line of lash glue along the band of the false lashes and wait a few seconds for it to become tacky. Carefully place the false lashes on your natural lash line, starting from the outer corner and working your way towards the inner corner. Gently press the lashes to secure them in place.
Clean up any fallout with a clean brush or cotton swab
During the eyeshadow application process, it’s common to experience fallout or excess eyeshadow on your under-eye area. To clean up any fallout, use a clean brush or cotton swab. Lightly sweep the brush or swab over the fallout, picking up any excess product. You can also use a small amount of concealer or foundation on a brush to clean up any stray eyeshadow and create a clean, polished look. Be gentle and ensure that you blend the area smoothly into the rest of your makeup for a seamless finish.
10. Perfecting the Cut Crease Technique
Practice your technique regularly
Perfecting the cut crease technique takes time and practice. Set aside dedicated practice sessions to refine your skills and experiment with different eyeshadow colors and techniques. Regular practice will help you become more comfortable with the process and allow you to fine-tune the details of your cut crease look. Don’t be discouraged if your first attempts don’t turn out exactly as planned. Keep practicing, and you’ll soon master the art of the cut crease.
Experiment with different eyeshadow combinations
One of the most exciting aspects of the cut crease technique is the ability to experiment with different eyeshadow combinations. Play around with various color palettes, finishes, and textures to create unique and personalized looks. Don’t be afraid to think outside the box and try unconventional color combinations. The more you experiment, the more you’ll discover what works best for your eye shape, skin tone, and personal style. Have fun and embrace your creativity.
Seek inspiration from makeup tutorials and social media
To expand your knowledge and skills in cut crease eyeshadow application, seek inspiration from makeup tutorials and social media platforms. There are countless tutorial videos available online that can provide step-by-step guidance and helpful tips. Explore social media platforms such as Instagram and Pinterest, where makeup enthusiasts and professionals often share their cut crease creations. Draw inspiration from their techniques, color choices, and overall aesthetics, and adapt them to make them your own. Engage with the online beauty community by sharing your own cut crease looks and connecting with fellow makeup enthusiasts.
With these expert tips and techniques, you’ll be well on your way to mastering the art of the cut crease. Remember to have patience, practice regularly, and most importantly, enjoy the process of creating beautiful and eye-catching eye looks. Whether you’re attending a special occasion or simply want to elevate your everyday makeup routine, the cut crease technique is sure to make a stunning statement. So grab your eyeshadow palette and let your creativity shine!

Stylish.ae’s Ultimate Guide To Eyeshadow Basics(Opens in a new browser tab)
Mastering The Art Of The Smokey Eye(Opens in a new browser tab)
The Secrets To Long-Lasting Eye Makeup(Opens in a new browser tab)