Step into the eerie world of zombies with “Zombie Zone: Mastering the Undead Look with Professional Techniques.” Whether it’s for a Halloween party or a thrilling photoshoot, this article will guide you on how to transform into a convincing zombie using expert techniques. From creating realistic wounds to mastering the art of undead makeup, you’ll learn all the insider tips and tricks to achieve a truly haunting appearance. So, grab your makeup brushes and get ready to give everyone a fright with your zombie transformation!
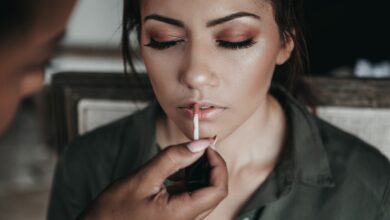
Choosing the Right Makeup Products for a Zombie Look
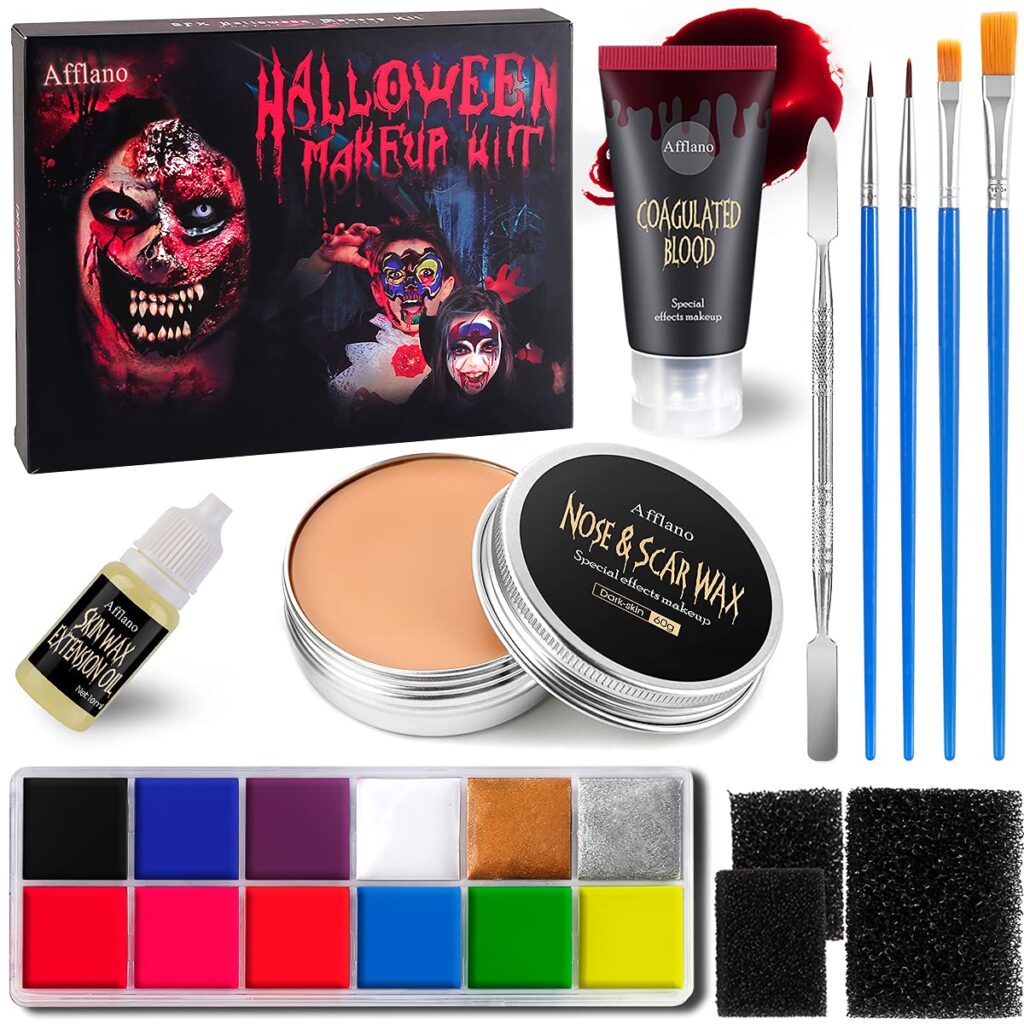
When it comes to creating a realistic zombie look, choosing the right makeup products is crucial. Understanding the different types of zombie makeup products available can help you achieve the desired effect. There are several key factors to consider when selecting the appropriate products for your undead transformation.
Understanding the different types of zombie makeup products
Zombie makeup products come in various forms, each serving a specific purpose in creating a convincing undead look. Some common types of zombie makeup products include:
- Water-based face paints: These are ideal for creating a base layer and adding color to your zombie complexion. They are easy to apply and can be easily blended to achieve a realistic appearance.
- Cream-based makeup: Cream-based products are great for creating depth and texture on the face. They can be used for contouring, adding scars or wounds, and creating other special effects.
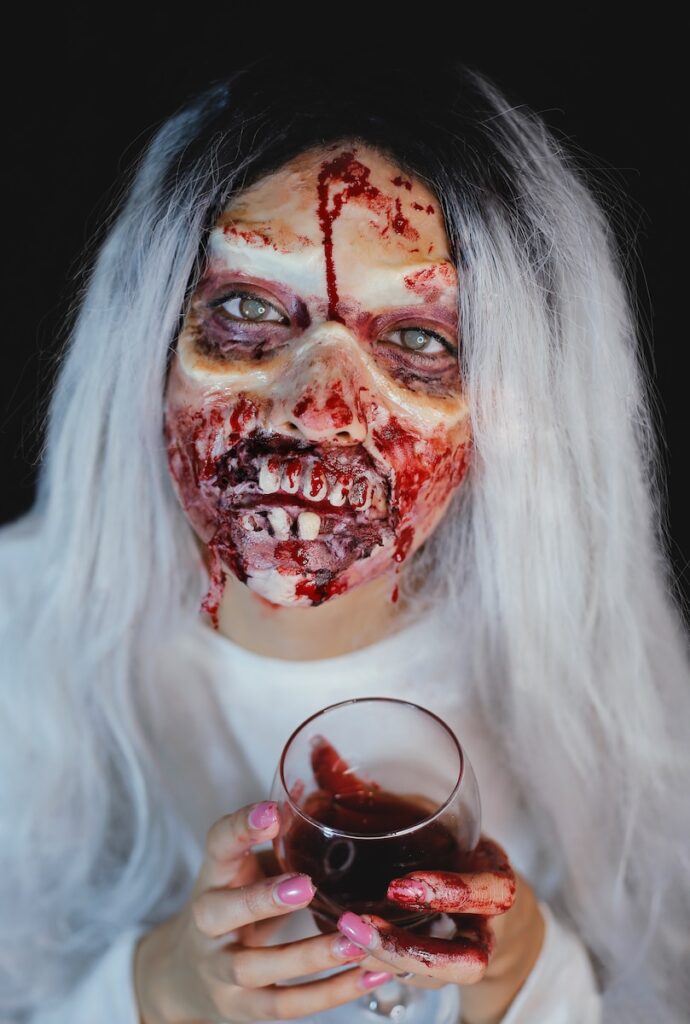
- Fake blood: Fake blood is an essential element in achieving a gory zombie look. There are different shades and textures of fake blood available, ranging from fresh wounds to dried blood. Selecting the right shades and textures can enhance the overall effect.
- Special effects makeup: Special effects makeup includes prosthetics, liquid latex, and other materials used to create wounds, rotting flesh, and other detailed effects. These products require a bit more skill and practice to use effectively but can take your zombie look to the next level.
Selecting the appropriate base makeup for a realistic undead look
To create a realistic undead look, you’ll need to start with the right base makeup. The key is to achieve a pale and lifeless complexion. Opt for a foundation shade that is a few shades lighter than your natural skin tone. This will help create that deathly appearance.
Consider choosing a foundation with a matte finish, as this will give your skin a dull and lifeless look. Apply the foundation evenly across your face, ensuring that you blend it well into your neck and hairline for a seamless transition.

Choosing the right shades of fake blood and bruises for a gory effect
To create a gory zombie effect, selecting the right shades of fake blood and bruises is essential. The color and texture of the fake blood can vary depending on the type of wound or injury you want to depict.
For fresh wounds, opt for a bright red shade with a glossy texture. This will create the illusion of fresh blood oozing from the wound. If you want to depict older or dried blood, choose a darker shade with a thicker, more clotted texture.
When it comes to bruises, consider using a combination of colors to achieve a realistic effect. Start with a base color that matches the undertone of your skin, then layer on shades of purple, blue, and green to mimic the stages of bruising. Blend the colors well and pay attention to areas where bruises would typically occur, such as the jawline or under the eyes.
Exploring special effects makeup for creating rotting flesh and wounds
If you want to take your zombie look to the next level, special effects makeup is the way to go. Liquid latex, prosthetics, and other materials can be used to create rotting flesh, wounds, and other detailed effects.
Liquid latex is a versatile product that can be used to create the appearance of peeling or decaying skin. Apply a thin layer of liquid latex to the desired area and gently stretch or manipulate the latex while it’s still wet to create realistic textures. Once dry, you can add additional details such as fake blood or other special effects products.
Prosthetics are pre-made appliances that can be attached to the skin to create realistic wounds or deformities. There are a wide variety of prosthetics available, ranging from small cuts and scars to more elaborate injuries. These can be adhered to the skin using spirit gum or other adhesive products, and then blended seamlessly into the rest of your makeup.
Prepping the Skin for Zombie Makeup
Before diving into the exciting world of zombie makeup, it’s important to prepare your skin properly. Taking the time to cleanse, exfoliate, and moisturize will ensure that your zombie makeup adheres well and lasts throughout the day.
Cleansing and exfoliating the face for better makeup adherence
Start by thoroughly cleansing your face to remove any dirt, oil, or makeup residue. This will create a clean canvas for your zombie makeup. Use a gentle cleanser that is suitable for your skin type, and rinse with lukewarm water.
After cleansing, exfoliate your skin to remove any dead skin cells and create a smooth surface. Choose a gentle exfoliating scrub or a chemical exfoliant that is specifically formulated for your skin type. Be sure to pay extra attention to areas where you’ll be applying makeup, such as around the nose, chin, and forehead.
Applying a moisturizer to create a smooth canvas
After exfoliating, it’s important to moisturize your skin to create a smooth canvas for your zombie makeup. Choose a lightweight, non-comedogenic moisturizer that is suitable for your skin type. Apply the moisturizer evenly across your face, focusing on areas that tend to be dry or prone to flakiness.
Allow the moisturizer to fully absorb into your skin before moving on to the next step. This will help create a hydrated and supple base for your makeup.
Using a primer to ensure longevity of the zombie makeup
To ensure that your zombie makeup lasts throughout the day or night, it’s essential to use a primer. A primer will create a smooth and even surface for your makeup, helping it adhere better and preventing it from smudging or fading.
Choose a primer that is specifically formulated for your skin type and apply it evenly across your face. Pay extra attention to areas where your makeup tends to wear off quickly, such as the T-zone or around the mouth.
Blotting excess oils to prevent makeup from smudging
If you have oily skin, it’s important to blot away any excess oils before applying your zombie makeup. Oily skin can cause makeup to slide and smudge, which can ruin the realistic effect you’re trying to achieve.
Use oil-absorbing sheets or blotting paper to gently pat away any excess oils. Focus on areas that tend to be oilier, such as the forehead, nose, and chin. This will help create a matte base for your makeup and prevent any unwanted shine throughout the day.
Creating a Pale and Lifeless Complexion
Achieving a pale and lifeless complexion is key when it comes to portraying a convincing zombie. With the right techniques and products, you can transform your skin into a deathly shade that will send shivers down anyone’s spine.

Using a pale foundation to achieve a deathly look
To create a deathly complexion, start by selecting a foundation shade that is several shades lighter than your natural skin tone. Look for foundations with cool or neutral undertones to avoid any warmth or natural glow. The goal is to achieve a ghastly pallor that looks anything but alive.
Apply the foundation evenly across your face, blending it well into the skin. Pay special attention to areas that tend to be darker, such as under the eyes or around the nose. Build up the coverage gradually until you achieve the desired deathly look.

Contouring with gray-toned shades to add depth to the face
To add depth and dimension to your zombie look, contouring is essential. Opt for gray-toned shades instead of the typical bronzer or blush. The gray tone will create a more lifeless and sunken appearance, which is perfect for a zombie look.
Apply the gray contouring shades to hollow areas of the face, such as the cheekbones, temples, and jawline. Blend the colors well, ensuring a seamless transition between the contour and the rest of your makeup. This will create the illusion of sunken and skeletal features, enhancing the overall undead effect.
Enhancing the appearance of sunken eyes and cheeks
One of the most important features to focus on when creating a zombie look is the appearance of sunken eyes and cheeks. This can be achieved through makeup techniques that emphasize the hollowed-out and lifeless look.
For the eyes, opt for dark, smoky shades such as gray or black. Apply these shadows to the eyelids and blend them towards the brow bone. This will create the illusion of deep-set and sunken eyes, giving you a more undead appearance.
For the cheeks, focus on creating a gaunt and hollowed-out effect. Use a black or gray eyeshadow to contour the hollows of your cheeks, blending it towards the temples. This will emphasize the sunken cheekbones, adding to the overall zombie aesthetic.

Adding highlights for a supernatural glow
While a zombie is far from glowing with health, adding subtle highlights to certain areas of the face can create a supernatural glow. Opt for iridescent or pale shades that will enhance the undead effect without adding too much warmth or color.
Apply the highlights sparingly to areas such as the brow bone, the bridge of the nose, and the tops of the cheekbones. This will create a subtle glow that adds an eerie and otherworldly element to your zombie look.
Adding the Characteristic Zombie Features
To truly embody the essence of a zombie, it’s important to pay attention to the characteristic features that define the undead. From bloodshot eyes to decaying teeth, these details will take your zombie look to the next level of realism.
Painting the undead eyes with a bloodshot effect
Bloodshot eyes are a characteristic feature of zombies. To recreate this effect, start by applying a light layer of red or pink eyeshadow across the entire eyelid. This will serve as the base for the bloodshot effect.
Next, use a darker shade of red or burgundy eyeshadow and apply it to the outer corners of the eyes, blending it towards the crease. This will create the appearance of blood pooling in the corners of the eyes, adding to the overall undead look.
To intensify the bloodshot effect, use a red or pink eyeliner to draw fine lines from the inner corners of the eyes towards the outer corners. These lines should appear broken and irregular, mimicking burst blood vessels.

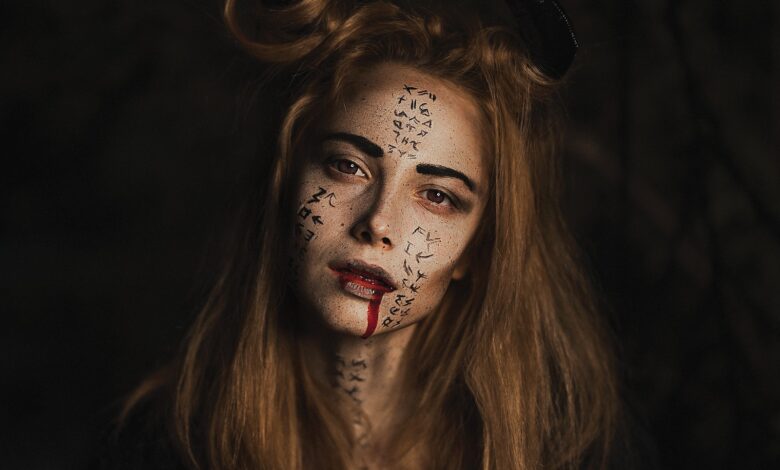
Drawing veins and blood vessels on exposed skin
To enhance the zombie effect, drawing veins and blood vessels on exposed skin is a great technique. This can be done using water-based face paints, a thin brush, and a steady hand.
Choose colors that mimic the appearance of veins, such as blue, green, or purple. Start by drawing thin lines or squiggles on areas such as the temples, neck, or hands. These lines should appear as though blood is flowing just beneath the skin, giving your zombie look a more realistic touch.
Creating decaying and rotting teeth with special effects makeup
Decaying and rotting teeth are a hallmark of a zombie’s appearance. To create this effect, special effects makeup is your best friend.
Start by applying a layer of liquid latex to your teeth, focusing on areas where you want the decay to be most prominent. Let the latex dry slightly until it becomes sticky, then use a toothpick or small brush to create cracks and crevices in the latex.
Next, apply a thin layer of translucent or yellow-colored wax over the latex. Use a toothpick or small brush to create the appearance of decay, such as missing chunks or jagged edges. Blend the wax with the rest of your teeth to create a seamless transition.
Finally, use a mixture of brown and black face paint to add depth and color variation to the decaying teeth. Apply the paint to the cracks and crevices, focusing on areas that would naturally accumulate dirt and decay.
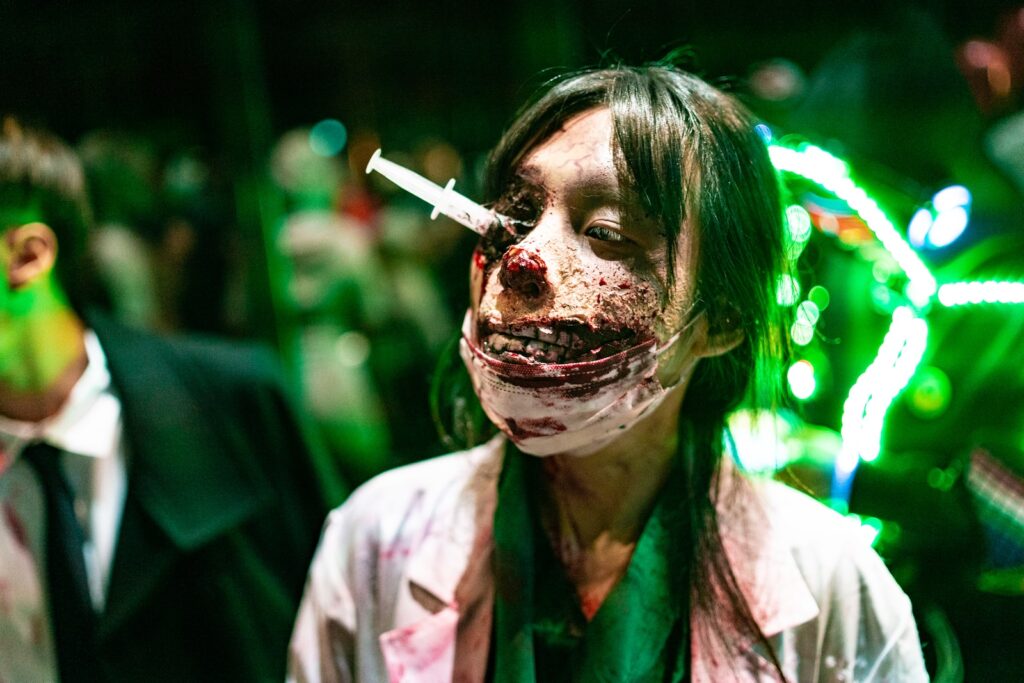
Simulating scars and bite marks for a more authentic look
Scars and bite marks can add an extra layer of authenticity to your zombie look. Special effects makeup products such as scar wax or liquid latex can be used to create these effects.
Start by applying a thin layer of scar wax or liquid latex to the desired area. Use a tool with a pointed edge, such as a toothpick or a makeup spatula, to create the desired shape of the scar or bite mark. Blend the edges of the wax or latex into the surrounding skin to create a seamless effect.
Next, use a combination of red, purple, and brown liquid or cream-based makeup to create the appearance of bruising and blood. Apply the colors to the inside of the scar or bite mark, gradually building up the intensity. Blend the colors well to create a realistic effect.
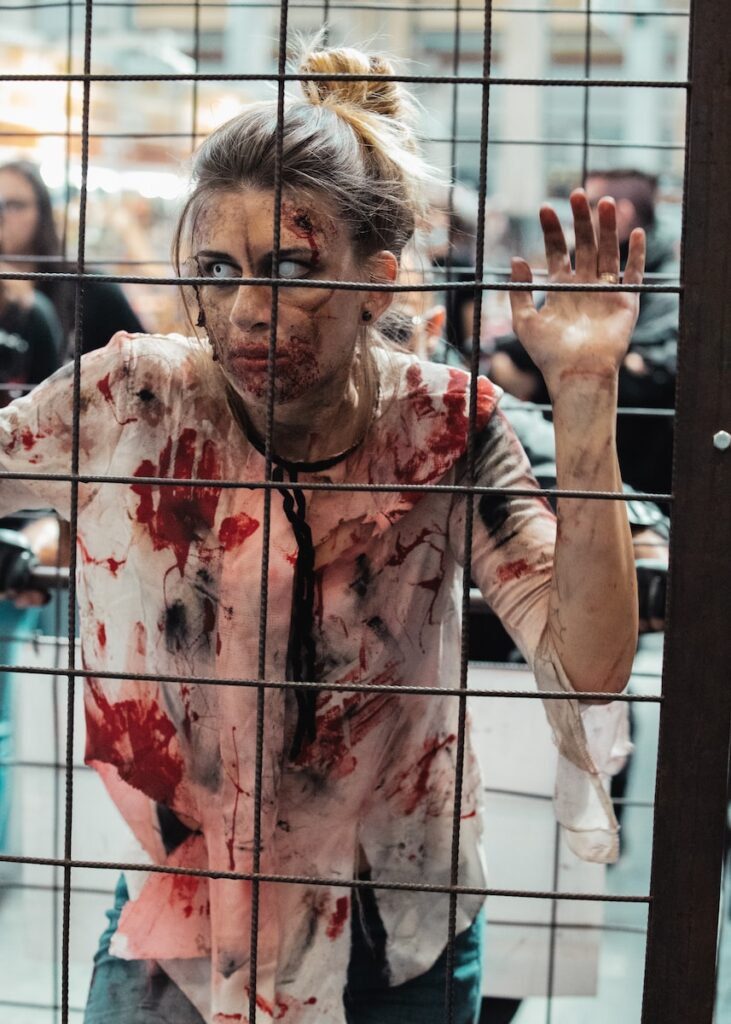
Enhancing the Zombie Look with Fake Blood and Bruises
To truly embrace the gory and gruesome nature of a zombie, utilizing fake blood and bruises is essential. These elements will add a realistic and chilling touch to your undead appearance.
Applying realistic-looking fake blood to wounds and torn flesh
When applying fake blood, it’s important to take into account the type of wound or injury you’re trying to depict. Different wounds require different textures and shades of fake blood for optimal realism.
For fresh wounds, opt for a bright red shade with a glossy texture. Apply the blood to the wound, allowing it to drip and pool for maximum effect. Consider adding a thin layer of clear or colored corn syrup over the fake blood to create the appearance of oozing or dripping fluids.
For older wounds or dried blood, choose a darker shade of red or brown with a thicker, clotted texture. Apply the blood sparingly, focusing on areas where the blood would naturally accumulate, such as the edges of a wound or around torn flesh.

Using different textures and shades of fake blood for added realism
To add depth and realism to your zombie makeup, using different textures and shades of fake blood is key. Think about the different stages of injury or decay and choose products that mimic these different textures.
For instance, in addition to the glossy and dripping fake blood for fresh wounds, consider using thicker blood pastes or coagulated blood products to create the appearance of dried or clotted blood. Apply these products strategically to areas where blood may have dried or congealed, such as around scabs or torn flesh.
By combining different textures and shades of fake blood, you can create a more dynamic and convincing zombie look.
Blending bruises and contusions for a realistic undead appearance
Bruises and contusions are another important element in creating a realistic undead appearance. When applying bruises, it’s important to consider the depth and color variation that comes with different stages of bruising.
Start by applying a base color that matches the undertone of your skin. This can be achieved using a black, blue, or purple cream or powder-based makeup product. Apply this base color to areas that would typically experience blunt force trauma, such as the jawline, cheekbones, or forehead.
Next, add additional layers of color to mimic the stages of bruising. Use lighter shades of purple, blue, and green to create the appearance of fading bruises. Focus on blending the colors well to achieve a natural and realistic effect. Remember to pay attention to areas where bruising typically occurs, such as around the eyes and along the cheekbones.
Creating scratches and scrapes using special effect makeup
To add more detail and realism to your zombie makeup, creating scratches and scrapes can be a great technique. Special effect makeup products such as liquid latex and scar wax can be utilized to achieve this effect.
Start by applying a thin layer of liquid latex or scar wax over the desired area. Use a pointed tool, such as a toothpick or a makeup spatula, to shape and create the appearance of scratches or scrapes. Blend the edges of the latex or wax into the surrounding skin for a seamless effect.
Next, use a combination of black, purple, and brown cream or powder-based makeup to add depth and color variation to the scratches and scrapes. Apply the makeup to the inside of the latex or wax, creating a realistic appearance of bruised or irritated skin.
Remember to blend the makeup well and add additional detail, such as dirt or grime, to enhance the overall effect.

Making the Zombie Makeup Last
Once you’ve put all the effort into creating the perfect zombie look, you’ll want it to last throughout the day or night. By following a few simple steps, you can ensure that your makeup stays in place and remains fresh.
Using setting powder to lock the makeup in place
Setting powder is a crucial step in making your zombie makeup last. After applying all your makeup, use a large, fluffy brush to lightly dust setting powder over your face. This will help lock the makeup in place, preventing it from smudging or fading throughout the day.
Opt for a translucent setting powder that won’t alter the color of your makeup. Apply the powder evenly, paying extra attention to areas where your makeup tends to wear off quickly, such as the T-zone or around the mouth.
Applying a setting spray for long-lasting effects
In addition to setting powder, a setting spray can provide an extra layer of protection for your zombie makeup. Setting sprays help to seal the makeup in place and prevent it from budging or melting, even in warmer or more humid environments.
After finishing your makeup, hold the setting spray bottle at arm’s length and mist your face evenly. Keep your eyes closed while applying the spray to avoid any discomfort. Allow the spray to dry naturally before touching your face or adding any additional makeup products.
Avoiding excessive touching or rubbing of the makeup
To ensure that your zombie makeup lasts, it’s important to avoid excessive touching or rubbing of your face throughout the day or night. This can cause the makeup to smudge or fade, compromising the overall effect.
Try to resist the temptation to rub or scratch any itchy areas, as this can disturb the layers of makeup and create an uneven appearance. If you need to touch your face, use a clean tissue or blotting paper to gently press against the skin instead of rubbing.
Reapplying certain elements of the zombie look throughout the day
Depending on the duration of your zombie outing, you may need to reapply certain elements of your makeup throughout the day. This is especially important for features such as fake blood, bruises, or special effects makeup that may naturally wear off over time.
Carry a small makeup kit with you that includes the necessary products for touch-ups, such as additional fake blood or bruise makeup. Take a few moments to check your makeup in a mirror and make any necessary adjustments to ensure that your zombie look remains fresh and convincing.
Completing the Zombie Look with Hair and Costume
To fully embody the zombie persona, it’s important to pay attention to the details, including the hair and costume. By creating a cohesive and authentic look from head to toe, you can truly bring your zombie character to life.
Creating messy and unkempt hairstyles to match the undead theme
When it comes to zombie hairstyles, messy and unkempt is the way to go. Think tangles, knots, and disheveled hair that looks as if it hasn’t been brushed or taken care of in months.
Start by backcombing or teasing your hair to create volume and texture. Use your fingers to twist and tousle the hair, adding a sense of chaos and disarray. Consider incorporating dry shampoo or texturizing spray to give the hair a matte and unwashed appearance.
For added authenticity, consider adding leaves, twigs, or other debris to the hair. This will create the illusion that your zombie has been crawling through the wilderness, adding to the overall undead theme.

Adding dirt and grime to the hair for a more realistic appearance
To enhance the authenticity of your zombie look, adding dirt and grime to the hair can make a significant difference. This can be achieved using a variety of products and techniques, depending on the desired effect.
Consider using dry shampoo or texturizing spray that contains brown or gray pigments. Apply these products sparingly to the roots and ends of the hair, focusing on areas that would naturally accumulate dirt or grime.
For a more realistic appearance, incorporate actual dirt or ashes into the hair. Sprinkle small amounts of dirt or ash onto the hair, focusing on the roots and ends. This will create a grimy and lived-in look that complements the overall zombie aesthetic.
Choosing appropriate zombie costumes and accessories
When it comes to selecting a zombie costume, the options are endless. Whether you opt for a tattered and torn dress, a shredded suit, or a blood-soaked hospital gown, the key is to choose clothing that reflects the decay and deterioration of the undead.
Consider incorporating elements such as ripped fabric, exposed skin, or visible bones into your costume. This will add a sense of realism and showcase the devastation of the zombie apocalypse.
In terms of color, opting for muted or desaturated tones is ideal. Think grays, browns, and washed-out shades that mimic the decaying and lifeless aesthetic of a zombie.

Accessorizing with props and prosthetics for an enhanced zombie persona
To truly embrace the zombie persona, don’t forget to accessorize. This can be done through the use of props and prosthetics that enhance the overall undead theme.
Consider incorporating items such as fake limbs, torn and bloody clothing, or sharp and rusty weapons into your costume. These props can add a sense of danger and horror to your zombie character, making the appearance more convincing.
Additionally, prosthetics such as wounds, scars, or decaying flesh can be attached to exposed areas of the body to add an extra layer of gore and realism. Adhere these prosthetics using spirit gum or other adhesive products, ensuring that they blend seamlessly into the rest of your makeup and costume.
Practicing Zombie Acting and Movements
Looking like a zombie is only part of the equation. To truly master the undead look, it’s important to practice your zombie acting and movements. By studying the characteristic movements and mannerisms of the undead, you can enhance the overall zombie look and create a more convincing performance.
Mastering the art of portraying a convincing zombie
Portraying a convincing zombie involves embodying the physical and emotional characteristics of the undead. Practice moving slowly and with purpose, as if your body is decaying or has limited mobility. Focus on moving from one point to another in a staggered manner, with jerky and exaggerated motions.
In terms of facial expressions, aim for a blank and vacant look that lacks emotion or focus. Keep your eyes dilated and unfocused, as if lost in an eternal state of undeath.
Remember to practice maintaining a steady and consistent pace, as zombies rarely move quickly or with agility. Embrace the awkwardness and lack of coordination, using it to your advantage to create a more authentic zombie performance.
Studying the characteristic movements and mannerisms of the undead
To enhance your zombie performance, study the characteristic movements and mannerisms of the undead. Watch movies, television shows, or theater performances that feature zombies to observe how actors portray these creatures.
Pay attention to the way zombies move their limbs, how they lurch forward or stumble, and how their body language communicates their undead state. Emulate these movements and mannerisms in your own performance, focusing on maintaining a constant and deliberate pace.
By understanding and replicating these characteristic movements and mannerisms, you can elevate your zombie look from mere makeup to a truly immersive and convincing performance.
Practicing zombie acting techniques for film or theater performances
If you’re interested in taking your zombie acting to the next level, consider practicing specific techniques for film or theater performances. This may involve studying camera angles, blocking, or acting techniques that enhance the overall effect on the big screen or stage.
For film performances, experiment with different camera angles to showcase the most effective and chilling aspects of your zombie look. Play with lighting and shadows to create a more ominous and eerie atmosphere.
For theater performances, focus on projecting your movements and expressions to reach the entire audience. Practice adjusting your performance to suit the size of the venue, ensuring that every person in the audience can fully experience your zombie character.
By practicing these specific techniques, you can fine-tune your zombie acting skills and leave a lasting impression on both viewers and fellow performers.
Enhancing the overall zombie look with coordinated movements
To fully immerse yourself in the world of zombies, consider enhancing the overall effect by incorporating coordinated movements with other zombies. This can be done in group performances, such as flash mobs or themed events, where multiple zombies interact with each other.
Practice moving in sync with other zombies, mirroring their movements and creating a sense of unity. Coordinate your actions to create a more immersive and realistic experience for both yourselves and the audience.
Remember to communicate and establish a clear plan of action beforehand, so everyone knows what movements and interactions to expect. This will help create a cohesive and seamless performance that truly showcases the undead spirit.
Zombie Makeup for Different Settings and Themes
Zombie makeup can be adapted to different settings and themes, allowing you to create unique and captivating looks for various occasions. Whether you’re going for a post-apocalyptic vibe, participating in a themed event, or working on a film or television production, customizing your zombie makeup can take your look to the next level.
Adapting the zombie makeup for a post-apocalyptic setting
In a post-apocalyptic setting, the zombie aesthetic often involves a more weathered and decayed appearance. Think torn and tattered clothing, exposed bones or organs, and a greater emphasis on dirt and grime.
To adapt your zombie makeup for a post-apocalyptic setting, consider adding more texture to your skin. Use products such as gelatin or tissues to create the appearance of rotting or decaying flesh. Add additional layers of dirt or ash to create a more worn and desolate look.
Incorporate elements such as props or prosthetics that evoke the aftermath of an apocalypse. This can include gas masks, makeshift weapons, or other survival gear, further enhancing the overall post-apocalyptic atmosphere.
Creating unique zombie characters for themed events
Themed events provide an opportunity to unleash your creativity and create unique zombie characters. Whether it’s a zombie walk, a Halloween party, or a cosplay event, themed settings allow you to explore different facets of the zombie aesthetic.
Consider the theme of the event and think about how you can incorporate it into your zombie character. For example, if the theme is a zombie prom, you can dress your zombie in a tattered prom dress or suit and accessorize with corsages or boutonnieres made from wilted flowers.
Experiment with different color schemes or makeup techniques to create a zombie character that stands out from the rest. Think outside the box and let your imagination run wild, creating a distinctive and memorable zombie look.
Exploring specific styles of zombie makeup for film and television
Film and television productions often call for specific styles of zombie makeup to suit the storyline and atmosphere. From slow-moving walkers to fast and aggressive infected, each type of zombie requires a unique approach to makeup.
Research the specific style of zombie makeup required for your project and study the works of seasoned makeup artists in the industry. Pay attention to the techniques they use, the products they recommend, and the overall aesthetic they achieve.
Collaborate with the production team and other makeup artists to ensure consistency in the zombie look across different scenes or episodes. This will help create a cohesive and believable world for the audience, enhancing the overall viewing experience.
Incorporating cultural and historical elements into zombie makeup
For a more unconventional and thought-provoking zombie look, consider incorporating cultural or historical elements into your makeup. This can add depth and a unique narrative to your zombie character, creating a more immersive and poignant experience.
Research cultural and historical references that pique your interest, such as traditional mourning rituals or real-life events. Use this knowledge to inform your zombie makeup, incorporating elements such as traditional clothing, accessories, or makeup techniques.
By blending the worlds of the living and the undead, you can create a zombie character that reflects a specific culture or historical period. This creates an opportunity for deeper exploration and storytelling within the zombie genre.

Removing Zombie Makeup Safely
After a long and thrilling day or night as a zombie, it’s important to remove the makeup properly to ensure the health and vitality of your skin. By following a few simple steps, you can safely remove the layers of zombie makeup while taking care of your complexion.
Using gentle makeup removers to take off the layers of zombie makeup
Start by using a gentle makeup remover to take off the layers of zombie makeup. Look for a product that is specifically formulated for removing heavy and long-wearing makeup. This will ensure that the stubborn pigments and textures are effectively lifted from your skin.
Apply the makeup remover to a cotton pad or soft cloth and gently wipe away the zombie makeup from your face. Be sure to pay extra attention to areas where makeup may have settled, such as around the eyes or in the crevices of special effects prosthetics.
Cleansing the skin thoroughly to prevent clogged pores and breakouts
Once the majority of the zombie makeup has been removed, it’s crucial to cleanse your skin thoroughly to prevent clogged pores and breakouts. Choose a gentle cleanser that is suitable for your skin type and work it into a lather with lukewarm water.
Gently massage the cleanser onto your skin, focusing on areas where makeup was applied. Use circular motions to ensure that the cleanser reaches deep into your pores and effectively removes any remaining traces of makeup or residue.
After thoroughly cleansing, rinse your face with lukewarm water, ensuring that all traces of cleanser and makeup are removed. Pat your skin dry with a clean towel, being careful not to rub or irritate your complexion.
Applying moisturizers and toners to restore hydration and balance
After removing zombie makeup, it’s important to restore hydration and balance to your skin. Apply a moisturizer that is suitable for your skin type, focusing on areas that may have become dry or irritated during the makeup removal process.
Additionally, consider using a toner to rebalance the pH of your skin and prepare it for the rest of your skincare routine. Look for a toner that is gentle and alcohol-free to avoid further drying or irritation.
Gently apply the toner to your skin using a soft cotton pad, focusing on areas that may be more prone to clogged pores or breakouts. Allow the toner to fully absorb into your skin before moving on to the next step.
Maintaining a regular skincare routine after zombie makeup applications
To keep your skin healthy and radiant after applying zombie makeup, it’s important to maintain a regular skincare routine. This includes cleansing, exfoliating, moisturizing, and protecting your skin on a regular basis.
Choose skincare products that are tailored to your skin type and specific concerns. Follow a consistent cleansing and exfoliating routine to remove dirt, oil, and dead skin cells. Apply moisturizers, serums, and other treatment products to nourish and hydrate your skin.
Additionally, it’s essential to protect your skin from harmful UV rays by using sunscreen daily. Look for a broad-spectrum sunscreen with an SPF of 30 or higher, and apply it generously to all exposed areas of your face and body.
By incorporating these skincare steps into your regular routine, you can ensure the health and vitality of your skin, even after applying and removing zombie makeup.