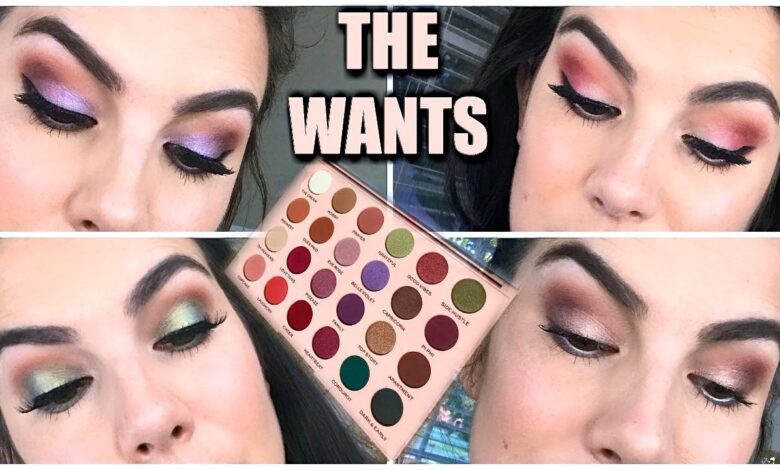
In the video tutorial by KathleenLights, she shows you how to create two eye looks using the Emily Edit “Wants” palette. The first look includes products such as L.A Girl Blackout Eyeliner, Abdel Faux Mink Wispies, Loreal Lash Paradise Mascara, and more. The second look incorporates shades like “Prayer” and “Family” for a purpley look. KathleenLights also mentions her own nail polish line called KL Polish and her collaborations with Colourpop. She provides discount codes and links for purchasing the mentioned products. The video is not sponsored and ends with a farewell and a reminder to subscribe to the channel for more content like this.
Look 1 Eye Makeup Tutorial
Welcome to this comprehensive eye makeup tutorial! In this tutorial, we will guide you through creating a stunning Look 1. So grab your brushes, it’s time to enhance those beautiful eyes of yours!
Products Used for Look 1
Before we begin, let’s have a quick rundown of the products we’ll be using for Look 1. For the transition shade, we recommend using a neutral matte eyeshadow such as “Warm Brown” from the XYZ eyeshadow palette. To create the halo eye look, you’ll need a shimmery gold shade like “Gilded” from the same palette. For a more defined look, a black eyeliner pencil and a waterproof mascara will come in handy. To highlight your brow bone and inner corners, a champagne-colored highlighter will do the trick. Finally, don’t forget your favorite pair of natural-looking falsies and a rosy blush.
Transition Shade
To start off Look 1, apply the transition shade all over your crease area to act as a base and create a seamless blend of colors. Using a fluffy blending brush, gently sweep the warm brown eyeshadow back and forth in windshield wiper motions. This soft transition shade will help to define your eyes and add depth to your overall look.
Creating a Halo Eye Look
Now it’s time to create the halo eye effect! Take a flat eyeshadow brush and dip it into the shimmery gold shade. Apply the eyeshadow to the center of your eyelids, focusing on the mobile lid area. Make sure to leave some space at the inner and outer corners for the next steps. This halo effect will give your eyes a mesmerizing glow and make them appear bigger and brighter.
Adding the Gold Shade
Next, take a smaller brush and apply the same gold shade to the inner and outer corners of your eyes, slightly overlapping the halo eyeshadow. This will create a gradient effect, adding dimension to your eye makeup. Don’t be afraid to build up the intensity by layering more eyeshadow until you achieve your desired level of shimmer.
Tightlining and Waterline
To make your lashes appear fuller and denser, gently tightline your upper waterline with a black eyeliner pencil. This technique involves applying eyeliner between the roots of your lashes, giving the illusion of thicker lashes. For an extra pop, apply a nude or white eyeliner to your lower waterline to make your eyes appear brighter and more awake.
Defining the Lower Lash Line
Now let’s define the lower lash line. Take the same fluffy blending brush you used for the transition shade and blend a small amount of the warm brown eyeshadow along your lower lash line. This will add balance to the look and tie everything together. For those who desire a bolder look, feel free to add a touch of the shimmery gold shade to the center of the lower lash line.
Highlighting the Brow Bone
To give your brows a natural lift and add an extra touch of dimension, apply a champagne-colored highlighter to your brow bone. Using a small eyeshadow brush, gently sweep the highlighter along the arch beneath your eyebrow. This will instantly create a fresh and awakened appearance, making your eyes appear more lifted and youthful.
Inner Corner Highlight
Now, let’s make your eyes pop even more! Take a small brush and dab the champagne highlighter on the inner corners of your eyes. This simple step will brighten up your entire look, making your eyes appear bigger and more radiant. It’s a subtle trick that can make a world of difference!
Falsies and Blush
To add an extra oomph to Look 1, let’s accentuate those lashes with a pair of natural-looking falsies. Apply some lash glue to the band of the falsies, allow it to become slightly tacky, and then carefully place the lashes along your lash line. Once they’re in place, use mascara to blend your natural lashes with the falsies for a seamless finish. To complete the look, apply a rosy blush to the apples of your cheeks, adding a touch of color and vibrancy to your face.
Highlighting the Face
Now that your eye makeup is complete, let’s move on to highlight the rest of your face. Take a fan brush and lightly dust your favorite highlighter across the high points of your face, including your cheekbones, down the bridge of your nose, and on your cupid’s bow. This will give your skin a beautiful luminosity and a youthful glow.
Setting the Face
To ensure your makeup lasts all day, set your face with a light dusting of translucent setting powder. Focus on the areas where makeup tends to crease or fade, such as your T-zone. Remember to apply the powder with a light hand to avoid a cakey or heavy appearance. This step will help to blur imperfections and give your skin a smooth and matte finish.
Lip Makeup
For Look 1, we suggest keeping the focus on your mesmerizing eyes by opting for a nude or natural lip color. Choose a shade that complements your skin tone and apply it with precision using a lip brush for a polished and flawless finish. Whether you prefer a satin, matte, or glossy texture, the choice is yours! Just be sure to keep the attention on your eyes by selecting a lip color that doesn’t overpower your overall look.

Look 2 Eye Makeup Tutorial
Now, let’s move on to Look 2, a captivating purpley eyeshadow look that will make your eyes stand out from the crowd!
Products Used for Look 2
Let’s start by introducing the products we’ll be using for Look 2. For this purpley eyeshadow look, you’ll need a vibrant purple shade such as “Amethyst” from the XYZ eyeshadow palette. To intensify the inner corner highlight, a silver or iridescent white eyeshadow will work wonders. An eyeliner pencil in a complementary shade and a volumizing mascara are essential. Finally, a cool-toned blush and a dazzling highlighter will add the finishing touches to your face.
Purpley Eyeshadow Look
To kick off Look 2, prepare to mesmerize with an enchanting purpley eyeshadow look. Purple shades have a magical way of enhancing various eye colors, making them appear more vibrant and alluring. Get ready to leave a lasting impression!
Applying Shades to the Lid
Using a flat eyeshadow brush, apply the vibrant purple shade to your entire lid, starting from the inner corner and sweeping it across to the outer corner. This color will serve as the base of your eyeshadow look, creating a stunning canvas for the rest of the shades we’ll be using. Build up the intensity gradually, making sure to blend the edges for a smooth transition.
Intensifying the Inner Corner Highlight
To make your eyes truly pop, take a smaller brush and apply a silver or iridescent white eyeshadow to the inner corners of your eyes. This highlight will create a beautiful contrast against the purple eyeshadow, making your eyes appear brighter and more awake. It’s a subtle touch that adds a touch of magic to your look!
Eyeliner and Mascara
Now it’s time to define your eyes even further. Choose an eyeliner pencil in a complementary shade such as deep plum or dark brown, and carefully line your upper lash line. This will add depth and intensity to your eye makeup. Follow up with a generous coat of volumizing mascara to make your lashes appear fuller and more voluminous. Take your time with this step to ensure a flawless finish.
Blush and Highlight
For Look 2, let’s bring some color to your face and accentuate your cheekbones. Opt for a cool-toned blush that complements the purple eyeshadow, such as a soft dusty rose or mauve shade. Apply the blush to the apples of your cheeks, blending it softly towards your temples for a natural and healthy-looking flush. To add a touch of radiance, follow up with a dazzling highlighter on the high points of your face, just like we did in Look 1.
Setting the Face
To make sure your makeup stays in place throughout the day or evening, lightly set your face with a translucent setting powder. Focus on areas where makeup tends to crease, such as your T-zone, to ensure a long-lasting and flawless finish. Be mindful not to over-powder, as we want to maintain a radiant and youthful appearance.
Lip Makeup
For Look 2, let your eyes take center stage by opting for a lip color that complements the overall look without overpowering it. A soft nude or mauve lip shade would be a perfect choice to maintain balance and allow your eye makeup to shine. Apply your chosen lip color with precision using a lip brush for a beautifully polished result.

Conclusion
Congratulations! You have now successfully completed both Look 1 and Look 2 eye makeup tutorials. Whether you prefer a golden halo eye or a purpley enchantment, these looks are sure to make your eyes dazzle. Remember, makeup is a form of self-expression, so don’t be afraid to experiment and make these looks your own.
We hope this tutorial has inspired you to try new eye makeup techniques and embrace your unique beauty. The key to achieving a flawless look is practice, so keep exploring and refining your skills. Play with different eyeshadow shades, experiment with various eyeliner techniques, and find the colors and styles that make you feel like the best version of yourself.
Thank you for joining us on this eye-opening journey! We wish you endless fun and creativity as you continue your makeup adventures. Farewell, and may your eyes always captivate and shine!