If you’ve ever wanted to achieve that flawless, sculpted look that seems to grace the faces of celebrities and influencers, then it’s time to learn the art of contouring and highlighting. In this article, we will explore the stylish.ae Artist’s Way of creating definition and luminosity to enhance your natural features. Whether you’re a makeup enthusiast or just want to amp up your everyday routine, get ready to discover the secrets behind achieving that effortlessly glamorous look.

1. What is Contouring and Highlighting?
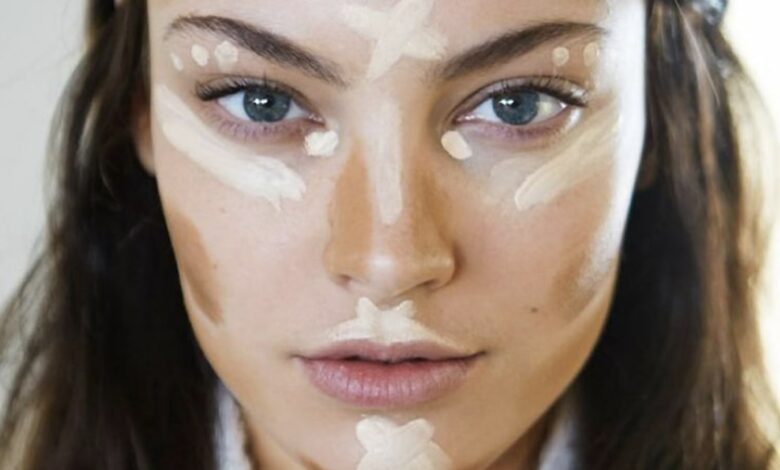
Contouring and highlighting are makeup techniques that can completely transform your face, enhancing your natural features and giving you a more sculpted, defined look. Contouring involves using darker shades to create shadows and give the illusion of depth, while highlighting uses lighter shades to bring attention to certain areas and make them appear more prominent. Together, these techniques can help you achieve a beautifully contoured and radiant complexion.
2. Benefits of Contouring and Highlighting
Contouring and highlighting offer a range of benefits that go beyond just creating a flawless makeup look. By strategically applying shadows and highlights, you can:
- Define your features: Contouring can help shape your face by enhancing your cheekbones, jawline, and nose, creating a more harmonious and balanced appearance.
- Create the illusion of symmetry: By using contouring and highlighting techniques, you can minimize any asymmetry in your facial features, making your face look more even and well-proportioned.
- Enhance natural beauty: Highlighting brings a luminous glow to your skin, making you look more radiant and youthful. It can also draw attention to your best features and give your face a healthy, dewy finish.
- Transform your face shape: Contouring is a valuable tool for those who wish to alter the appearance of their face shape. Whether you want to soften a square jawline or add more definition to a round face, contouring can help you achieve your desired look.
- Enhance your makeup look: Contouring and highlighting can take your makeup application to a whole new level. These techniques can provide depth and dimension to your overall look, making your features stand out and complementing your eye, lip, and cheek makeup.
3. Tools and Products for Contouring and Highlighting
To achieve a flawless contour and highlight, you’ll need the right tools and products. Here are some essentials to add to your makeup collection:
Contouring Tools:
- A contour brush: Look for a brush with a slanted or angled shape that allows for precise application of contour products.
- Beauty sponge or blending brush: A sponge or brush is essential for blending out harsh lines and creating a seamless finish.
Contouring Products:
- Cream or powder contour: Choose a shade that is a few shades darker than your natural skin tone. Cream contours work best for dry or normal skin, while powder contours are ideal for oily skin types.
Highlighting Tools:
- Fan brush: A fan brush is perfect for applying highlighter to the high points of your face, such as the cheekbones, brow bone, and bridge of the nose.
Highlighting Products:
- Liquid, cream, or powder highlighter: Opt for a shade that complements your skin tone, whether you prefer a subtle glow or a more intense, shimmering effect.
4. Preparing Your Skin for Contouring and Highlighting
Before diving into the world of contouring and highlighting, it’s important to ensure your skin is prepped properly. Here are some steps to follow:
- Start by cleansing your face with a gentle cleanser to remove any dirt, oil, or makeup residue.
- Apply a lightweight moisturizer to hydrate your skin and create a smooth canvas for makeup application.
- Use a primer to blur out imperfections, minimize the appearance of pores, and help your makeup last longer.
- Apply a foundation that matches your skin tone to create an even base.

5. Step-by-Step Guide to Contouring and Highlighting
Once your skin is prepped and ready, it’s time to dive into the step-by-step process of contouring and highlighting. Here’s a foolproof guide to achieving a flawless finish:
- Start by applying your foundation as you normally would, ensuring it is well blended into your skin.
- Using a contour brush, apply a small amount of cream or powder contour to the areas you want to create shadows, such as the hollows of your cheeks, along your hairline, and under your jawline. Remember to start with a light hand and build up the intensity gradually.
- Next, take a beauty sponge or blending brush and blend the contour product into your skin using gentle tapping or swirling motions. This will help soften any harsh lines and create a more seamless finish.
- Now, it’s time to highlight. Take your preferred highlighter and apply it to the high points of your face, such as the tops of your cheekbones, the bridge of your nose, the cupid’s bow, and the brow bone. Again, blend out any harsh lines for a natural and radiant look.
- To complete the contouring and highlighting process, use a fluffy brush to blend everything together. This will ensure a flawless, airbrushed finish and help the products seamlessly meld with your foundation.
6. Different Contouring Techniques for Various Face Shapes
Every face shape is unique, and different contouring techniques can be used to enhance specific features. Here are some tips for contouring various face shapes:
Round Face:
- Create the illusion of more defined cheekbones by applying a contour shade just below the cheekbones and blending it upwards towards the temples.
- Use a lighter shade or a highlighter on the center of the forehead and chin to help elongate the face.
Square Face:
- Soften the angles of a square face by applying contour along the jawline and blending it downwards. This will create a more rounded and tapered appearance.
- Highlight the center of the forehead and the center of the chin to draw attention away from the jawline.
Oval Face:
- Oval faces are already well-balanced, so focus on adding subtle definition to enhance your natural features.
- Use a contour shade to add depth along the hairline and under the cheekbones, then blend it out for a soft and natural look.
Heart-shaped Face:
- To balance a heart-shaped face, contour the sides of the forehead and the temples to minimize width at the top of the face.
- Apply contour along the jawline to create a more harmonious shape.

7. Highlighting Techniques to Enhance Your Features
Highlighting can help accentuate and enhance your natural features. Here are some highlighting techniques to try:
- Apply a highlighter to the tops of your cheekbones for a radiant glow.
- Highlight the bridge of your nose to make it appear more prominent and slim.
- Add a touch of highlighter to the inner corners of your eyes to make them appear brighter and more awake.
- Apply a highlighter to the cupid’s bow to enhance the shape of your lips.
- Highlight the brow bone to make your eyebrows pop and create a lifted appearance.
8. Contouring and Highlighting for Different Skin Tones
Contouring and highlighting techniques can be adapted to suit different skin tones. Here’s how to make it work for you:
- Fair Skin: Opt for cooler-toned contour shades to avoid looking muddy. Soft peach or champagne highlighters work well for a subtle glow.
- Medium Skin: Warmer, slightly bronzed contour shades can add more depth to medium skin tones. Golden or rose gold highlighters can bring warmth and radiance to the complexion.
- Dark Skin: Rich, deep contour shades are ideal for darker skin tones. Look for highlighters with golden or bronze undertones for a stunning glow.

9. Common Mistakes to Avoid in Contouring and Highlighting
While contouring and highlighting can work wonders, there are a few common mistakes to be aware of:
- Applying too much product: Start with a light hand and gradually build up the intensity. It’s easier to add more product than to remove excess.
- Choosing the wrong shades: Make sure to choose contour and highlight shades that complement your skin tone. Avoid shades that are too dark or too light, as they can look unnatural.
- Forgetting to blend: Blending is key to achieving a seamless and natural finish. Take the time to blend out any harsh lines and ensure a smooth transition between shades.
10. Finishing Touches: Blending and Setting
To ensure your contour and highlight last all day and look flawless, don’t forget these finishing touches:
- Blend everything together using a fluffy brush. This will help create a seamless finish and prevent any harsh lines.
- Set your makeup with a translucent powder to keep everything in place and prevent any smudging or fading.
By following these tips and techniques, you’ll be able to master the art of contouring and highlighting, enhancing your natural beauty and achieving a flawless complexion. Remember, practice makes perfect, so don’t be afraid to experiment and find what works best for you. Get ready to unleash your inner artist and embrace a new level of confidence with contouring and highlighting!

Maybelline New York Concealer Review(Opens in a new browser tab)
Catrice More Than Glow Highlighter Silky Soft Review(Opens in a new browser tab)
Charlotte Tilbury Hollywood Contour Wand Light-Medium Review(Opens in a new browser tab)